PhotoLabeler Help
This is an example of the use of PhotoLabeler. For this example you can make use of the trackfile and the photo's found here.
There are a few restrictions:
* the trackfile must be in gpx 1.0 (not 1.1) format. This is the xsd file.
Have a look at the example trackfile to see the format.
* the outputdirectory should not already contain the files to be written there.
You can use the tool freely but be warned that you use it at your own risk. I advise you to always work on copies of your original photo's. There is no support, but I might look at my mail at irregular times . . .
Version 0.0.2 is a pre-release and a log4j window will appear on startup which you can close or minimize.
Example
|
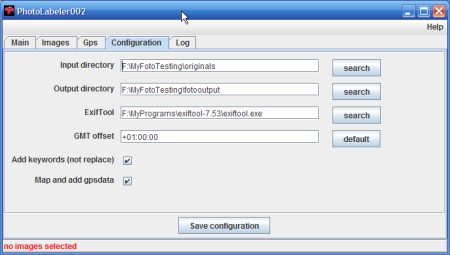
Step 1 Start the tool (java -jar PhotoLabeler-0.0.2.jar) and go to the configuration tab. Select an input directory, an output directory and most important select the exiftool executable. If you plan to map a gps trackfile select the selectbox. If you want keywords to be added instead of overwritten make a selection. The GMT offset field can be used to set the standard difference between GMT and the timezone you are in. This can be handy as most GPS trackfiles use GMT time. With the default button you get the GMT difference with the computer time. (So if your computer is in the timezone you were when you made your pictures this is the way to go). Use the button to save the settings. |
|
|
Step 2 Put the photofiles in the input directory. Go to the images tab and select the photo's. |
|
|
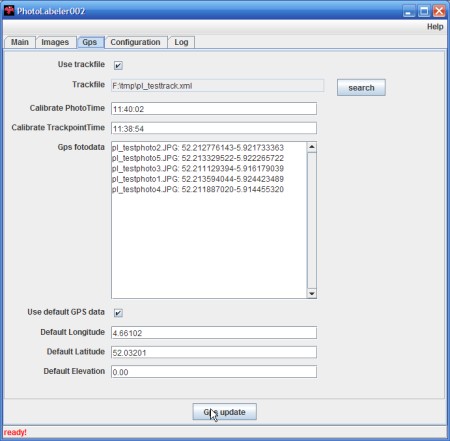
Step 3 Go to the gps tab and select the trackfile (be sure the it is in the right xml format, gpx 1.0). In order for the mapping to be correct it is important to calculate the time offset between picture time and trackpointtime. Fill in the time of a picture and the time of the corresponding point in the trackfile. If you know the offset you can just fill in 2 timestamps with the difference. Be aware that the timestamps in the trackfile are normally Greenwich times. For example here in the Netherlands the difference is 1 hour in winter and 2 hour in summer (see configuration screen on how to set the GMT offset). If you use the example files put 11:40:02 as the phototime (see timestamp photo 1) and 11:38:54 as the trackpointtime and put +01:00:00 in de the GMT offset configuration field. Now press Gps update and wait for the result to appear on the screen. Release 0.0.2 also has the option to have default GPS coordinates which are used if the photo's cannot be mapped or if no trackfile is used. |
|
|
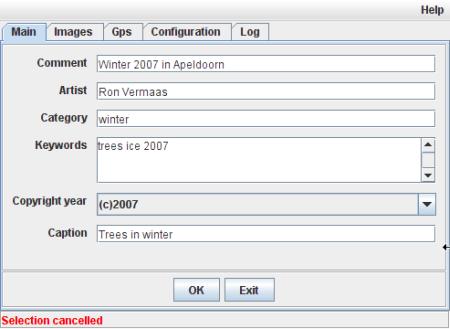
Step 4 Go to the main tab and fill in the fields as required. After that you can press the OK button and wait until ready appears. If everything went well you will find updated photos in the output directory. If you check the exif information of e.g. photo 1 you see something like shown in the screenshot next to this text. If you upload your photo's e.g. to a picassa webalbum you get this without having to add manually location information. |
|
|
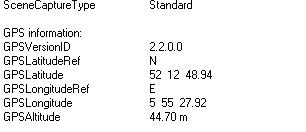
Step 5 If you check the exif information of e.g. photo 1 you see something like shown in the screenshot next to this text. If you upload your photo's e.g. to a picassa webalbum you get this without having to add manually location information. |
|
Tips and Tricks
As the tool only works with standardized gps 1.0 xml files. To convert your trackfile to this format there is a handy translation site .Known errors
| * | There is no check on the validity of the trackfile contents, but the tool will hang or give error when the file is not gpx 1.0. | |
| * | As the tool makes use of ExifTool it might break with future releases of ExifTool if interface of that tool changes. | |
| * | The links in the about screen don't work (as I did not implement a listener for these). | |
| * | You have to rename or copy exiftool(-k).exe to exiftool.exe. | |
| * | It is not extremely fast . . . |